When programming, something most applications have is a user interface. A key duty of the user interface is to show the values and data inside the application and allow interaction with it.
Delphi and C++ Builder excelled from the beginning with TDataSet and TDataSource enabling developers to rapidly prototype database applications, linking data to controls via a couple of properties and making them fully data aware and interact-able. This was, and still is awesome. This approach however has some drawbacks.
- You always need data aware versions of your controls
- It only works with TDataSet descendants (i.e. not with TObject)
Live Bindings was introduced in Delphi , C++ Builder , RAD Studio XE3 primarily as a way to link FireMonkey Controls (that don’t use the TDataSource model) to data, but also allow any object to be bound to and shown visually.
LiveBindings in Delphi & C++ Builder VCL applications
While LiveBlindings is at the core of fast FireMonkey prototyping, the VCL still has a rich heritage of TDataSource components that enable prototyping the traditional way using TDBGrid, TDBEdit, TDBLabel etc. So is LiveBindings useful or needed in VCL?
Beyond TDBxxxx the VCL also has a rich set of inbuilt and 3rd party controls (e.g. TListView) that are not data aware in the traditional approach. LiveBindings is however a doorway to using these controls alongside the traditional data aware controls.
LiveBindings is a powerful way to add in new functionality to existing applications or mix in functionality that you wouldn’t have thought possible in the traditional VCL model as we are about to see.
Making VCL TListView data aware!
Taking the example of a database aware VCL application we are going to add TListView as an alternative source for the data.
The start point for this application is a traditional VCL application with a TDataSource and TDataSet, (I’m using a TClientDataSet and biolife sample XML data as I can quickly load this in from the samples folder).
The DataSource.DataSet property is set to the ClientDataSet and the DataSource is used to link 3 data aware controls (2 x TDBEdit and 1 x TDBImage) to the data.
At this point, rather than using a TDBGrid to create a master list on the left to navigate the data, I will show how we can use a TListView a non data aware control to Group the data in a list.
Firstly, we need the data in order in the DataSet so they group correctly. This is done with the ClientDataSet by setting the IndexFieldNames property. In this example it is set to “Category;Common_Name” to order the data by Category and name.
Now its time to add a TListView component and set the following properties to show the data in groups and columns
- GroupView = True
- ViewStyle = vsReport
And add some columns, I added Common Name and Length CM, but you can put anything as the titles. (we are going to use Category as the group so no need to have a column for that)

Finally, its time to get the data added. Traditionally with data aware controls we would use would run via a TDataSource, but we will use LiveBindings. Right click on the TForm and choose Bind Visually (or choose View > LiveBindings Designer)
You will now see components on the form represented in the LiveBindings Designer. Select “Synch” on the ListView by clicking and holding the mouse button down, and move the mouse over the * on the DataSet. This will create a binding that keeps the record cursor inline with the data on the screen.

Next, we can add the fields to the ListView properties.
- Item.Caption = Common_Name
- Item.SubItems = Length (cm)
- ItemHeader.Header = Category
You should now see the data as in the image above, and at run time, selecting the items in the ListView will automatically update the cursor in the DataSet.
A perhaps not so well known fact about LiveBindings is that they can be used in VCL as well as FireMonkey applications. The traditional VCL data-aware controls are still available though and for reasons that will quickly become apparent, I wouldn’t advise ripping out your VCL TDBEdits just yet.
We’re going to build the same application as we did in part 1 but for VCL. You might be tempted to skip over this tutorial but I’d advise against it. Due to a lack of features in the LiveBindings design-time support for VCL there are a lot more manual steps we have to do and these steps are also very applicable for FireMonkey. Also what you’ll learn in this tutorial will help you when we move onto more complex and interesting LiveBinding uses.
Position the controls
First we create a new VCL application by selecting
- VCL Forms Application

Now we need a database for our application to access. Drop a TClientDataSet (or any other TDataSet descendent) and a TDataSource on the form just as you would in any other VCL application.
Connect the TDataSource to the TClientDataSet by it’s DataSet property, exactly as you normally do.
If you used a TClientDataSet you’ll need to specify an XML data file for it to load. I’m using the biolife.xml file from the Delphi XE2 samples directory.
Next drop onto the form one of each of these standard controls
- TLabel
- TEdit
- TMemo

And now drop a TStringGrid onto the form.
Your form should now resemble this.
Setup the Binding Engine

Now we need to start binding these standard controls to the database fields.
Drop a TBindingsList anywhere onto your form.
Follow it with a TBindScopeDB, also anywhere on your form.
Now we link the binding engine to the database engine by the DataSource property of the TBindScopeDB.
Bind the TLabel
It’s at this point that the steps required for VCL LiveBindings differ significantly from the optimal steps for FireMonkey LiveBindings. All of these steps will work in FireMonkey too though, they’re just not the quickest and easiest way to do it.
With the TLabel selected, in the Object Inspector select
- LiveBindings
- Dropdown arrow
- New LiveBinding

the FireMonkey version
To jog your memory here’s the same object inspector property dropdown list for the FireMonkey version of this application. For the FireMonkey version we selected the “Link to DB Field” option however the “New LiveBinding” option is also available.

The “New LiveBinding” dialog lists the types of Bind Components available to you. The “Links” branch represent classes to designed expressly to link UI controls to database fields.
We want to use the simplest type of link, a “TBindLink” which links a single valued control like a TLabel or TEdit with a single database field.
This is primary reason you have a TBindingsList component on your form, you really don’t do much else with it in most cases.
The Bindings List dialog should contain a single bind component, “BindLinkLabel11” as shown below.
Select the BindLinkLabel11 bind component from the list and check that the Object Inspector now shows BindLinkLabel11 and its properties.
In the Object Inspector set the SourceComponent to the TBindScopeDB component on your form.
If you look in the dropdown list you’ll also see the TLabel component we’re binding to in that list. It’s important you don’t select that TLabel. For SourceComponent think data source and while the TDataSource is also in that list, you need to connect to the TBindScopeDB which is in turn connected to the TDataSource.
Set the SourceMemberName to the database field you wish to display in the TLabel.
In this instance “Source” is the source of the data, “Member” is a field of that data source and “Name” is the name of that field.
The list entry for the bind component should almost read like a sentence expressing how the binding should behave.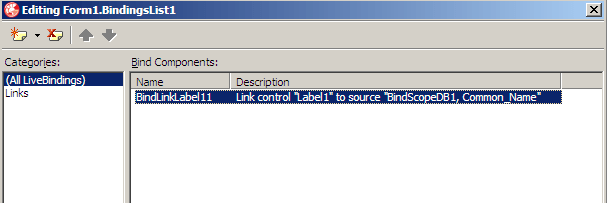
Double click the bind component in the list, in this case the BindLinkLabel11.
You should see the Binding Expression Editor dialog as shown below.
Binding Expressions are instructions for the LiveBindings engine on exactly how to bind, in this instance, a database field to a UI control.
For a TBindLink bind component there are 3 types of expressions, Format, Parse and Clear expressions. These represent instructions to the LiveBindings engine on formatting data to display to the user, parsing the data entered by the user and clearing the data to an empty or default value.
Select the “Format” collection of expressions.
Now click the “New Expression” button above it (look for the yellow page icon).
A new expression will appear in the list named “Format”.
Note its “Operation” reads “Assign to control”.
The “Control expression for Label1” is the expression that the LiveBindings engine will use to assign a value to the TLabel.
Enter “Caption” as this value for this expression. By doing this you are directly referring to the TLabel.Caption property.
The “Source expression for BindScopeDB1, CommonName:” is the expression that the LiveBindings engine will use to format the data it reads from the database field.
Enter DisplayText as the value for this expression. By doing this you are directly referring to the TField.DisplayText property. You could also use AsString, Value or Text, all of which are properties of TField and achieve a similar or identical result.
You might have noticed these tick and cross buttons to the right of the expressions. If you click the tick button the expression value you entered will immediately be reflected in the expression list above.
Clicking the tick button is optional though as closing the dialog or switching to another expression has the same effect.
Your completed expression should appear like this.
Close the Expression Editor dialog and then close the Bindings List dialog beneath it to return to the form.
Bind the TEdit
Once again the process for binding the TEdit starts in a similar way. Select the TEdit and then in the Object Inspector click
- LiveBindings
- Dropdown arrow
- New LiveBinding

Again we select TBindLink as it is the most appropriate bind component for linking a single database field with a single valued UI control.
Double click the TBindingsList component on your form to display the Bindings List dialog.
You’ll now have 2 bind components listed, one for the TLabel and one for the TEdit.
Select the BindLinkEdit11 bind component from the list and ensure it is shown in the Object Inspector.
Set the BindLinkEdit11.SourceComponent property in the Object Inspector remembering that the “source” is synonymous with the “data source” and that the TBindScopeDB is link between the LiveBindings engine and the TDataSource.
The SourceMemberName property is the database field name you wish to bind to.
The BindLinkEdit11 in the bind components list should now almost read as a sentence expressing how the control will be bound to the field.
Double click the BindLinkEdit11 bind component in the list to display the Expression Editor dialog.
With the “Format” collection selected press the “New Expression” button (leftmost button, with the yellow document icon).
A new expression will appear in the list, note its operation is “Assign to control”.
The “Control expression” refers to the property of the TEdit we wish to bind to.
Enter the word “Text” which will directly refer to the TEdit.Text property.
It is possible to enter any TEdit property here although it really only makes sense to use the Text property.
The “Source expression” refers to the property of TField that we wish to use as the source for the binding.
You can use any TField property, in this case I’ve chosen TField.AsString which for an Edit control is more appropriate than TField.DisplayText.
Click on the “Parse” collection.
Click the “New Expression” button again to create a new expression named Parse.
Note its operation is “Assign to source” rather than “Assign to control”. A Parse expression describes how the input from the user should be parsed and assigned to the field or “data source”.
The “Control expression” refers to the TEdit property we want the binding to read when saving its value to the database.
Enter “Text” to tell it to use the TEdit.Text property.
For the “Source expression” enter the TField property you wish to be set by the binding when data is saved to the field.
The most appropriate TField property is “Value” although you could also use TField.AsString.
Note that despite the fact that we’re now sending data in the opposite direction from the “Format” expression, the “source” still refers to the database field, rather than the UI control.
The use of the term “source” can be a little confusing because of this as right now our “source” is actually the destination. It’s best not to think in terms of source and destination but instead keep in mind the data “source” and the UI “control”.
Bind the TMemo
Close both dialogs to return to the form then select the TMemo and in the Object Inspector click
- LiveBindings
- Dropdown arrow
- New LiveBinding

Once more choose a TBindLink to link a single valued control to a database field.
Double click the TBindingsList component on your form to display the Bindings List dialog.
Select the BindLinkMemo11 bind component from the list.
With the BindLinkMemo11 properties displayed in the Object Inspector set the SourceComponent to your form’s TBindScopeDB component which in turn is linked to the TDataSource.
As we’re binding to a TMemo the SourceMemberName will refer to BLOB field from the “data source”.
In the biolife.xml dataset the “Notes” field is a BLOB text field.
The BindLinkMemo11 should now almost read as a set of instructions to the LiveBindings engine as below.
Double click the BindLinkMemo11 bind component in the list to display the Expression Editor dialog.
Select the “Format” collection and click the “New Expression” button above it (look for the yellow document icon).
A new expression named Format will be added to the list. This expression instructs the LiveBindings engine on how to display the data to the user.
The “Control expression for Memo1” refers to the property of TMemo that needs to be updated with the field value from the database.
As TMemo uses a TStrings object to store its data internally we need to reference that internal TStrings object via the TMemo.Lines property, then reference the TStrings.Text property for a single property that can be set.
Enter “Lines.Text” which directly refers to the TMemo.Lines.Text property.
The “Source expression” as usual refers to the field from the “data source”/database.
Enter “AsString” to use the TField.AsString property.
If you were to use the TField.DisplayText property you’ll see something familiar but not quite what you’re after. For a BLOB text field TField.DisplayText returns “(MEMO)” rather than the actual text. This is what you’re used to seeing for BLOB fields in the TDBGrid.
Click on the “Parse” collection and then the “New Expression” button above it.
A new expression named “Parse” will be added to the list.
Note its operation reads “Assign to source” rather than “Assign to control”. This is the expression that instructs the LiveBindings engine on how to read the data from the user and save it to the database.
The “Control expression” refers to the property of the TMemo we can interrogate to obtain the data entered by the user.
Enter “Lines.Text” to instruct the LiveBindings engine to read the TMemo.Lines.Text property when parsing the user input.
The “Source expression” refers to the database field where the data is to be saved (despite being called the “source”).
Use the “Value” property to store the user input in the TField.Value property.
The TField.AsText property would work here equally as well.
Open the DataSet and run the application

At run-time in the FormCreate event open your dataset.
Run the finished application.
Finished application?
Err… excuse me…
What about the Grid?
This is where the LiveBindings design-time VCL support really doesn’t measure up. While it’s a little annoying to have to create the LiveBindings manually for TEdit, TLabel and TMemo controls for a TStringGrid the annoyance factor goes off the charts.
For LiveBindings to operate on a TStringGrid you have to create multiple bindings for columns, rows, cells, positions… It’s a task that’s reduced to just a few clicks in FireMonkey but currently for VCL it’s just hard work.
If I’m brave enough I’ll devote a future article to how to create these manual bindings for a TStringGrid. It’s something you really don’t ever want to have to do yourself though so hopefully the VCL design-time support is improved soon.
7 comments on “LiveBindings Part 2 – Displaying database data in a VCL (or FireMonkey) application ”
I’ll be covering grids in several more parts to this series. Some showing how you hook them up, others discussing the issues you’ve mentioned.
Take a look at Part 1 of this series to see how LiveBindings for VCL will likely look in the near future. In FireMonkey LiveBindings are much simpler to use but you still have access to their full power and flexibility (which I haven’t yet explored in this series).
TBH I don’t get the point of LiveBindings either, “manual” code-based binding is simple, straightforward, foolproof, in case of bugs you get compiler errors, you can place the code anywhere (not in the form), they’re simple to debug, and give a nice simple overview of what is bound to what.
LiveBindings on the other hand, even when they’re supported by the IDE, are convoluted to setup and very fragile as C J said.
I would also add that they’re obfuscated from casual review, mistakes are very hard to diagnose and tracing with the debugger is insanely confusing.
Thanks for the article. Makes me think TDataSource and TDBGrid aren’t that bad after all!
Wow. I thought I was the only one who thought LiveBindings with a TStringGrid is convoluted and nearly useless with a VCL stringgrid. Populating a stringgrid using LiveBindings in FireMonkey is very slow with a moderate size clientdatabase compared to similar code in a VCL DBGrid. Perhaps because stringgrid does not have BeginUpdate or EndUpdate to inhibit redrawing the screen. With an 584 kb *.cds clientdatabase with 26 columns and 5000 records, the FM stringgrid takes about six to ten seconds to “load” to a stringgrid. A VCL DBGrid loads “instantaneously” with the identical clientdataset. I expect this dataset will also load at snail’s pace with a VCL LiveBinding to a stringgrid.
Thanks for showing how to deal with LiveBindings for several VCL controls. Your upcoming tutorial will be appreciated. I want to compare the filling of the DBGrid with the VCL LiveBbindings with my dataset.
Embarcadero’s LiveBindings database examples with clientdata set use very small datasets and are useless to convert for use with my own data without the step by step instructions you hopefully will provide to set-up the controls. The Embarcadero VCL LiveBindings examples load and populate the grid. The process ‘looks’ fast but I expect probably would be slow with a moderate database like I am have. Perhaps I am missing a ‘trick’ to speed up loading a VCL or FM grid using LiveBindings?
I am very much looking forward to your next tutorial. Thank you.
Did Microsoft patent binding things the simple way with dotNet?
I’d rather write a big pile of
Edit1.Text:= DataSet.FieldByname(‘Field1’).AsString;
And the reverse saving logic. At least it is clear, easy to read and maintainable. This, this is just… If I was honest and used the words that come to mind, I would get a second post in a week nuked.
Let’s go with ugly, tedious, over complicated, fragile and very easily broken – all things to be avoided when possible.
4 Pings/Trackbacks for "LiveBindings Part 2 – Displaying database data in a VCL (or FireMonkey) application"
[…] LiveBindings Part 2 – Displaying database data in a VCL (or FireMonkey) application […]
[…] UI controls to data sources and to each other, including LiveBindings for databases Part 1 and Part 2 on this blog however most of my development with Delphi and C++Builder is heavily OO focused. I […]
[…] have received a major revamp and should no longer require enormous walk-throughs and additional lines of code just to replace a few getter and setter […]
В Delphi XE2 LiveBindings мне нужно привязать элемент управления VCL любого типа к свойству любого типа на произвольном (некомпонентном) объекте. Я могу сделать это односторонне. Но мне нужно сделать это в двух направлениях.
Скажем, я хочу привязать строку TPerson.PersonName: к TEdit.Text.
То, что у меня сейчас, простое.
- Создайте новое приложение VCL, добавьте TBindScope, TBindingsList, TEdit.
- Создайте экземпляр TPerson с именем person1.
- Используя BindingList, добавьте свойство TBindExpression.
- С BindExpression
- установить ControlComponent в Edit1
- установите ControlExpression в "Текст"
- установить SourceComponent в BindScope1
- установить SourceExpression в PersonName
- Добавить кнопку; к событию Click Я добавляю: BindScope1.DataObject: = person1;
- Добавить кнопку; к событию Click, которое я добавляю (требуется только один, но пока он не будет работать, я попробую их оба).
- TBindings.Notify(отправитель, "");
- BindingsList1.Notify(отправитель, "");
Первая кнопка связывается в первом направлении. Вторая кнопка никогда не возвращает значение обратно в свойство person1.PersonName.
Я экспериментировал с кодом уведомления, направлением привязки, типами привязки, выражениями, SourceMember и т.д. Иногда я получаю ошибки времени выполнения в конфигурации bindexpression, а остальное время привязка просто однонаправленная.
Я ожидаю щелкнуть вторую кнопку и увидеть содержимое Edit1.Text, написанное для person1.PersonName.
Если мне нужно сделать все это из кода, я буду рассматривать его, и такие примеры приветствуются, но я действительно хочу сделать это через конструктор, если это возможно.
Обратите внимание, что мне не интересно связывать два элемента управления.
Обратите внимание, что я уже загрузил и просмотрел примеры проектов LiveBinding и не нашел ничего такого. Если это неверно, будьте конкретны, указав это. Я также прочитал DocWiki. Он не охватывает двунаправленную привязку, за исключением использования элементов управления DB LiveBinding. Я не использую элементы управления DB LiveBinding и не использую DataSet. Поэтому, если вы не можете объяснить мне, почему я должен их использовать, мне не нужна информация об этих элементах управления.
1 ответ
Теперь у меня это работает. Я сделал все это в дизайнере, но преобразовал его в основном код, чтобы лучше делиться им с SO.
Создайте проект форм VCL. В форме отбросьте каждый из них по форме:
TBindScope TBindingsList TButton TButton TEdit
Переименуйте одну из кнопок в btnLoad, а другую - в btnSave.
Вставьте этот код в блок формы (при условии, что он называется Form1). Назначьте обработчики кликов для кнопок и запустите их. Нажмите btnLoad, чтобы заполнить поле редактирования данными объекта TPerson, отредактируйте текст в поле редактирования до нового значения, затем нажмите btnSave, чтобы записать его обратно в объект TPerson.
Unit Form1; interface uses Winapi.Windows, Winapi.Messages, System.SysUtils, System.Variants, System.Classes, Vcl.Graphics, Vcl.Controls, Vcl.Forms, Vcl.Dialogs, Vcl.StdCtrls, System.Rtti, // LiveBinding units System.Bindings.Helper, // Contains TBindings class Data.Bind.EngExt, Vcl.Bind.DBEngExt, Data.Bind.Components, System.Bindings.Outputs; type TPerson = class(TObject) protected fName: string; fAge: integer; procedure SetName(const Value: string); public property Name: string read fName write SetName; property Age: integer read fAge write fAge; end; type TForm1 = class(TForm) btnLoad: TButton; btnSave: TButton; BindScope1: TBindScope; BindingsList1: TBindingsList; Edit1: TEdit; procedure btnLoadClick(Sender: TObject); procedure btnSaveClick(Sender: TObject); private fInitialized: boolean; fPerson: TPerson; procedure Initialize; public procedure AfterConstruction; override; procedure BeforeDestruction; override; end; var Form1: TForm1; implementation {$R *.dfm} procedure TForm1.AfterConstruction; begin inherited; Initialize; end; procedure TForm1.BeforeDestruction; begin fPerson.Free; inherited; end; procedure TForm1.btnLoadClick(Sender: TObject); begin fPerson.Name:= "Doogie Howser"; fPerson.Age:= 15; BindScope1.DataObject:= fPerson; end; procedure TForm1.btnSaveClick(Sender: TObject); begin TBindings.Notify(Edit1, ""); // Could also do this: //BindingsList1.Notify(Edit1, ""); end; procedure TForm1.Initialize; var expression: TBindExpression; begin // Create a binding expression. expression:= TBindExpression.Create(self); expression.ControlComponent:= Edit1; expression.ControlExpression:= "Text"; // The Text property of Edit1 ... expression.SourceComponent:= BindScope1; expression.SourceExpression:= "Name"; // ... is bound to the Name property of fPerson expression.Direction:= TExpressionDirection.dirBidirectional; // Add the expression to the bindings list. expression.BindingsList:= BindingsList1; // Create a Person object. fPerson:= TPerson.Create; end; { TPerson } procedure TPerson.SetName(const Value: string); begin fName:= Value; ShowMessage("Name changed to ""+ Value +"""); end; end.


